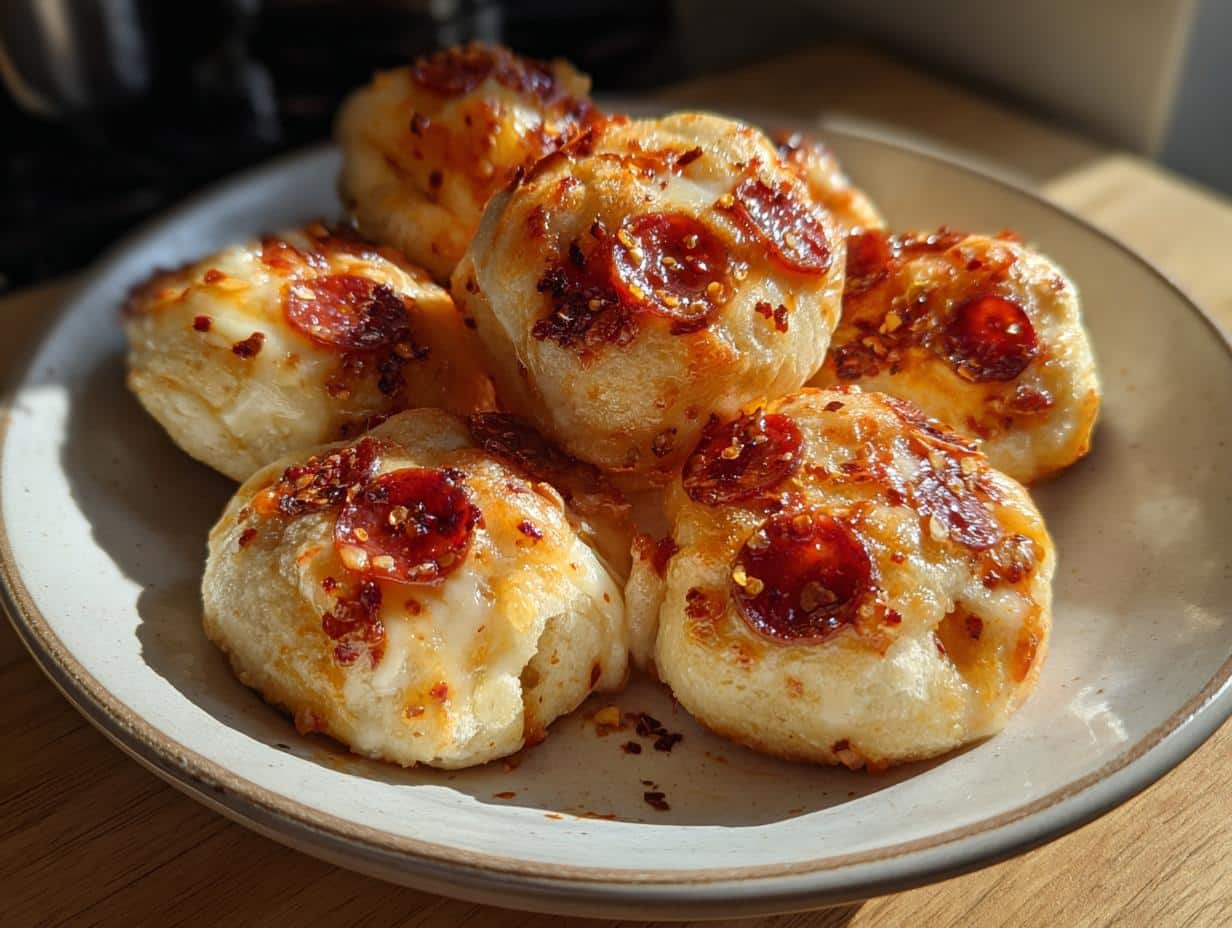
You know those pre-packaged pizza lunchables from the store? Let me let you in on a little secret – homemade versions taste about a million times better! I started making these DIY Pizza Lunchables when my kids kept begging for the store-bought ones (which honestly always looked kinda sad to me). The first time we made them together, flour went everywhere, cheese ended up on the floor, and my kitchen looked like a tornado hit it – but oh my gosh, the laughter and delicious results were totally worth it!
What I love most is how crazy simple these are. With just pizza dough, sauce, cheese, and whatever toppings your heart desires, you’ve got a lunch that beats anything from a box. Plus, you control the ingredients – no mystery preservatives here! Whether you’re meal prepping for the week or making a fun activity with kids, these customizable mini pizzas are my go-to. Trust me, once you try making your own, you’ll never go back to those limp, overpriced store versions again!
Table of Contents
Why You’ll Love These DIY Pizza Lunchables
Listen, I know you’re busy, and that’s exactly why these little pizza bites are about to become your new best friend. Here’s why:
- Crazy quick: From fridge to table in under 20 minutes – even faster than waiting for delivery!
- Totally yours: Want extra cheese? Go for it! Hate mushrooms? Skip ’em. Your pizza, your rules.
- Kid-magic: My picky eaters actually eat vegetables when they get to arrange their own toppings. (Parenting win!)
- Meal prep superstar: Make a big batch Sunday night and you’ve got lunches sorted for days. No more sad desk lunches!
Seriously, once you taste that first crispy, cheesy bite, you’ll wonder why you ever bought the store version. The flavor difference is night and day!
Ingredients for DIY Pizza Lunchables
Okay, let’s gather our pizza-making supplies! Here’s what you’ll need for the most epic homemade lunchables ever:
- 1 cup pizza dough – store-bought works great (I won’t judge!), or go homemade if you’re feeling fancy
- 1/2 cup pizza sauce – my secret? A tiny pinch of garlic powder stirred in makes it extra tasty
- 1 cup shredded mozzarella cheese – packed (because let’s be real, cheese is the star here)
- 1/4 cup sliced pepperoni – cut into cute little quarters if you want that authentic lunchable look
- 1/4 cup sliced bell peppers – I like the colorful mix of red, yellow and green, sliced super thin
- 1/4 cup sliced mushrooms – optional but delicious if you’re a fungi fan like me
That’s it! See? Just a handful of simple ingredients standing between you and pizza perfection. Now let’s get cooking!
How to Make DIY Pizza Lunchables
Alright, pizza artists – let’s turn these simple ingredients into mini masterpieces! I promise it’s easier than trying to open those plastic-wrapped store versions without tearing the cheese (why is that so hard?!). Here’s my foolproof method for perfect pizza bites every time.
Step 1: Prep the Dough
First, crank that oven to 400°F – we want it nice and toasty when our pizzas go in! Now for the fun part – grab your dough and roll it out on a lightly floured surface. I aim for about 1/4 inch thickness – thick enough to hold toppings but thin enough to get crispy. Pro tip: A drinking glass or biscuit cutter makes perfect little circles (about 3 inches across). Don’t stress if they’re not identical – homemade charm is part of the fun!
Step 2: Add Sauce and Toppings
Time to get creative! Spread about a teaspoon of sauce on each dough circle – just enough to coat without making it soggy. Then comes the cheese (the more the merrier, I say!) and your favorite toppings. My kids love making “designs” with their pepperoni slices – sometimes I swear they spend more time arranging than eating! Remember: lighter toppings = crispier crust, so go easy if you want that perfect crunch.

Step 3: Bake and Cool
Pop those beauties on a parchment-lined baking sheet (trust me, cleanup is way easier this way) and bake for 10-12 minutes. You’ll know they’re done when the cheese gets all bubbly and the edges turn that perfect golden brown. Here’s the hardest part – let them cool for 5 minutes before digging in! I know, I know – the smell is torture, but this keeps the cheese from sliding right off. Worth the wait, promise!

Tips for Perfect DIY Pizza Lunchables
After making these more times than I can count (okay fine, my kids request them weekly), I’ve picked up some tricks to take your pizza lunchables from good to “oh-my-gosh-can-I-have-another”:
- Parchment is your pal: Line that baking sheet! No more scraping melted cheese off pans – the parchment lifts right off with zero mess.
- Crispier crust hack: For extra crunch, bake the naked dough circles for 3 minutes before adding toppings. Game changer!
- Cheese insurance: Sprinkle a light layer of cheese under your toppings too – helps everything stick together better.
- Cool completely for lunchboxes: Room temp pizzas won’t steam up containers – no one likes soggy crust by lunchtime!
Little things make big differences with these – try one tip at a time or go all in for pizza perfection!
Ingredient Substitutions & Variations
One of the best things about these DIY pizza lunchables? You can mix and match ingredients based on what you’ve got or dietary needs! Here are my favorite swaps that still deliver on flavor:
- Dough dilemmas? No problem! Gluten-free dough works beautifully, or try naan bread or even tortillas for a crispy thin-crust version.
- Cheese choices: Vegan cheese melts surprisingly well these days, or try ricotta dollops for a creamy twist. My lactose-intolerant niece swears by almond-based mozzarella!
- Meat lovers: Turkey pepperoni is our go-to for less grease, or skip meat entirely and load up on roasted veggies – zucchini and eggplant work wonders.
- Sauce switch: Out of pizza sauce? A smear of pesto or even hummus makes an unexpectedly delicious base!
The possibilities are endless – that’s the beauty of homemade!
Storage and Reheating
These pizza bites are best fresh, but if you’ve got leftovers (unlikely in my house!), pop them in an airtight container for up to 2 days. When reheating, skip the microwave – it makes them soggy. Instead, crisp them back up in a toaster oven or regular oven at 350°F for about 5 minutes. The crust will thank you!
Nutritional Information
Each pizza lunchable (based on our recipe with standard ingredients) packs about 250 calories, with 10g protein to keep you full. The exact numbers will dance around depending on your toppings – that’s the fun of customization! Just remember: more cheese = happier tastebuds but higher fat content (no regrets here!).
FAQs About DIY Pizza Lunchables
I get asked these questions all the time when friends see my kids’ lunchboxes – here’s the scoop on making and storing your pizza lunchables like a pro!
Can I freeze these pizza bites?
Honestly? I wouldn’t. The texture gets weird when thawed – they’re best fresh! If you must, freeze just the dough circles and assemble fresh when ready to bake.
Will whole-wheat dough work?
Absolutely! It adds a nice nutty flavor. Just roll it slightly thinner since whole wheat tends to be denser. My kids don’t even notice the switch!
What’s the best way to pack these for lunches?
I use small divided containers – keeps toppings from making the crust soggy. Toss in some grape tomatoes or carrot sticks to complete the lunchable experience!
Can I make these ahead for meal prep?
Totally! Assemble unbaked pizzas on Sunday, cover tightly, and refrigerate up to 2 days. Bake as needed – they’ll taste just-made!
Help! My cheese slides off when baking!
Ah, the classic pizza struggle! Try sprinkling a light layer of cheese first, then toppings, then more cheese – it acts like edible glue!
Share Your Creations!
Now I wanna see YOUR pizza masterpieces! Did you create a pepperoni flower design? Invent a crazy new topping combo? Snap a pic and tag me – I live for these kitchen creations! Nothing makes me happier than seeing families having as much fun with this recipe as we do. Happy pizza-making, friends!
For more delicious inspiration, check out our Pinterest page!
Print
15-Minute DIY Pizza Lunchables Kids Will Devour Instantly
- Total Time: 22 minutes
- Yield: 4 servings
- Diet: Vegetarian
Description
A fun and easy way to make your own pizza lunchables at home. Perfect for kids and adults alike.
Ingredients
- 1 cup pizza dough
- 1/2 cup pizza sauce
- 1 cup shredded mozzarella cheese
- 1/4 cup sliced pepperoni
- 1/4 cup sliced bell peppers
- 1/4 cup sliced mushrooms
Instructions
- Preheat your oven to 400°F (200°C).
- Roll out the pizza dough and cut into small circles.
- Spread pizza sauce on each dough circle.
- Add shredded mozzarella cheese and your favorite toppings.
- Bake for 10-12 minutes until the crust is golden.
- Let cool before serving.
Notes
- You can customize toppings to your preference.
- Store leftovers in an airtight container for up to 2 days.
- Great for meal prep or school lunches.
- Prep Time: 10 minutes
- Cook Time: 12 minutes
- Category: Lunch
- Method: Baking
- Cuisine: Italian