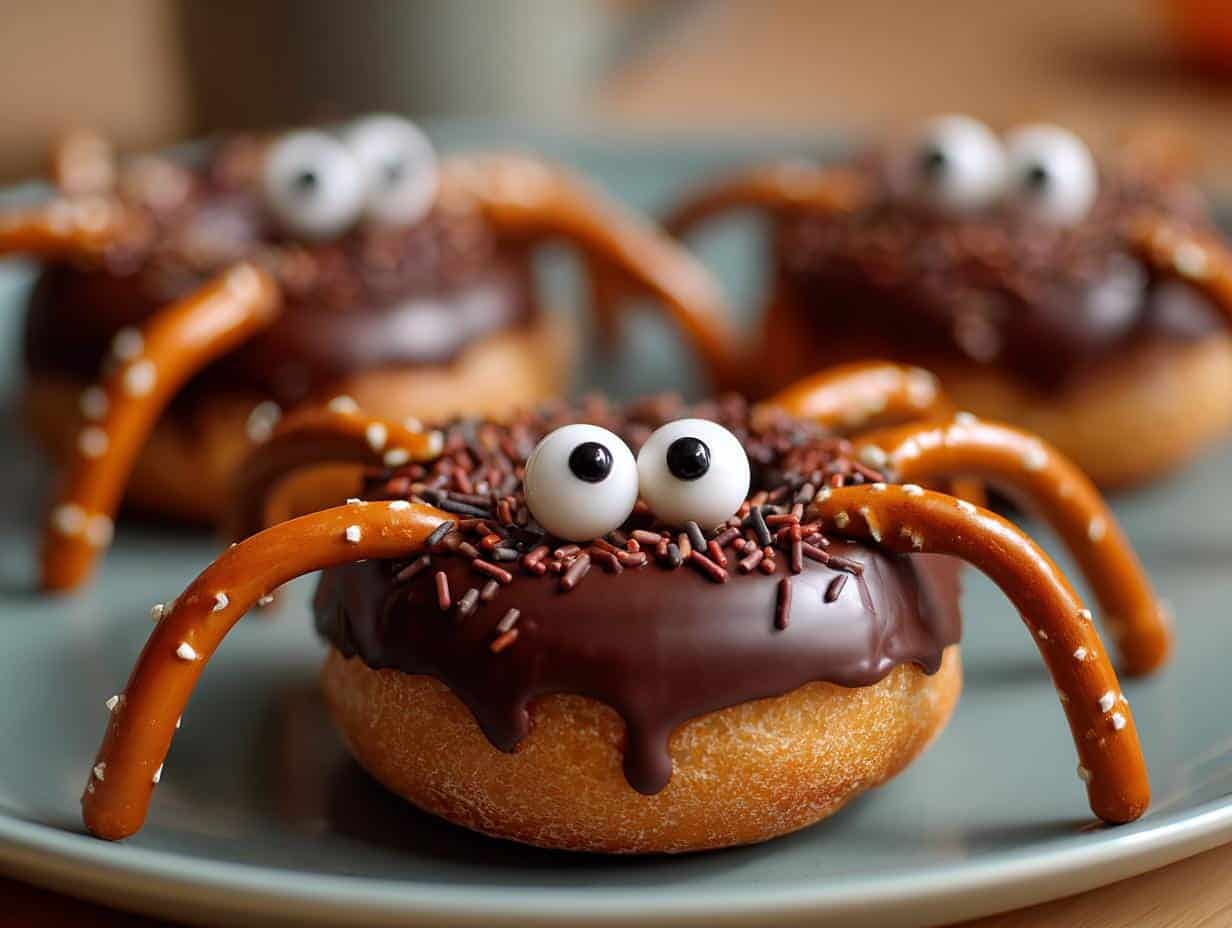
There’s something magical about Halloween treats that look creepy but taste delicious—like these adorable yet spooky Halloween spider cookies! I still remember the first time my niece and I made them together. She squealed with delight (and a little mock terror) as we pressed the pretzel legs into the chocolatey cookies. “They’re crawling right off the plate!” she giggled. That’s the beauty of these cookies—they come together in under 30 minutes, but the fun lasts all season. Whether you’re hosting a monster mash or just want to surprise the kids after school, these eight-legged goodies always steal the show. The best part? You probably have most ingredients in your pantry already!

Why You’ll Love These Halloween Spider Cookies
Trust me, these cookies are a total win for spooky season—here’s why:
- So easy a zombie could make them: No fancy skills needed—just mix, bake, and assemble!
- Kid-approved fun: Little hands love pressing in the pretzel legs and googly eyes (and sneaking peanut butter cups).
- Deliciously creepy: Rich chocolate cookies with melty peanut butter centers? Yes, please—even the pickiest little monsters devour them.
- Instant Halloween vibes: They look like they crawled straight out of a haunted house, but taste like pure celebration.
Seriously, these might just become your new October tradition.
Ingredients for Halloween Spider Cookies
Grab these simple ingredients—most are probably in your kitchen already! The measurements matter here, especially for that perfect spider body texture.
- 1 cup all-purpose flour (spooned and leveled—don’t pack it!)
- 1/2 cup unsweetened cocoa powder (sifted if clumpy)
- 1/2 tsp baking soda (fresh for maximum lift)
- 1/4 tsp salt (balances the sweetness)
- 1/2 cup unsalted butter, softened (leave it out for 30 minutes—it should dent when pressed)
- 3/4 cup granulated sugar (the spiders’ sweet secret!)
- 1 large egg (room temperature blends better)
- 1 tsp vanilla extract (the good stuff—no imitation!)
- 24 mini peanut butter cups (unwrapped—tempting, I know)
- 48 candy eyes (because spiders need personality)
- 1/2 cup chocolate chips, melted (the “glue” for those googly eyes)
- 24 thin pretzel sticks (broken into 48 little legs—snap them carefully!)
Pro tip: Measure everything before starting—you’ll be moving fast once those cookies come out of the oven!
How to Make Halloween Spider Cookies
Okay, let’s make these creepy-crawly cookies come to life! The key is working quickly while the cookies are warm—they’re most pliable then. Don’t worry if they’re not perfect; spiders in nature aren’t symmetrical either!
Baking the Cookie Base
Start by rolling the dough into 1-inch balls—I like to use a small cookie scoop for consistency. Gently flatten each ball slightly with your palm (they’ll spread more while baking). Bake for exactly 10 minutes at 350°F. The cookies should look set around the edges but still soft in the center—they’ll firm up as they cool. This gives you the perfect base for pressing in our spider “bodies.”

Assembling the Spiders
The moment those cookies come out of the oven, press a peanut butter cup into the center of each one—they’ll sink in beautifully. Let cool for 5 minutes, then use melted chocolate as glue for the candy eyes. Pro tip: Tweezers make placing those tiny eyes WAY easier! Finally, carefully insert pretzel pieces as legs—I do four per side at an angle so they look like they’re crawling. If the chocolate sets too fast, just dab a tiny bit more to “stick” any loose legs.
Warning: That melted chocolate is sneaky—it gets everywhere! Keep paper towels handy and maybe don’t wear your favorite Halloween sweater while decorating.
Tips for Perfect Halloween Spider Cookies
After making these cookies every Halloween for years (and learning from a few oops moments), here are my foolproof tricks:
- Chill sticky dough: If the dough feels too soft after mixing, pop it in the fridge for 15 minutes—it’ll be easier to roll.
- Parchment is your BFF: It prevents spreading and makes cleanup a snap when the melted chocolate goes rogue.
- Short legs stay put: Keep pretzel pieces under 1.5 inches—longer legs tend to snap when inserting them.
- Work fast: Have peanut butter cups unwrapped and eyes ready before baking—warm cookies are much more cooperative!
Bonus: If a leg breaks? No stress—just dip the end in melted chocolate and “glue” it back on. Spiders regenerate, right?
Ingredient Substitutions & Variations
No peanut butter cups? Allergic to gluten? No worries—here’s how to tweak these spiders for any crowd:
- Peanut-free: Swap in mini chocolate-covered caramels or even Rolo candies for that gooey center.
- Gluten-free: Use a 1:1 GF flour blend and gluten-free pretzels (Snyder’s makes great thin ones!).
- Vegan: Substitute vegan butter and a flax egg, plus dairy-free chocolate chips for “glue.”
- Eyes: No candy eyes? Pipe white icing dots and add mini chocolate chips upside-down!
My niece once made rainbow spiders with colored candy melts—Halloween meets unicorn magic!
Storing and Serving Halloween Spider Cookies
These little critters stay fresh in an airtight container at room temperature for up to 3 days—if they last that long! For parties, arrange them on a web-like platter with melted chocolate drizzled between cookies. They look especially creepy crawling over a cake stand or surrounded by cotton “spiderwebs.” Pro tip: The peanut butter cups soften over time, creating an even gooier center—my favorite way to eat them!
Halloween Spider Cookies Nutritional Information
Here’s the scoop on these spooky treats—keep in mind these are estimates per cookie (and let’s be real, who stops at just one?): 120 calories, 6g fat, and 9g sugar. They’re meant for festive fun, not your daily diet!
FAQs About Halloween Spider Cookies
Q1. Can I freeze these spider cookies?
Absolutely! Freeze baked (but undecorated) cookies for up to 1 month in an airtight container. Thaw at room temperature before adding peanut butter cups and decorations. The pretzel legs get soggy if frozen assembled, so add those fresh.
Q2. How do I keep the pretzel legs from breaking?
The trick is snapping them gently—don’t bend, twist slightly while pressing down. If they still crack, dip the broken end in melted chocolate first; it acts like armor! Also, inserting legs at a slight angle helps distribute pressure.
Q3. Can I make these spider cookies ahead of time?
You can bake the cookie bases 1 day early and store them in an airtight container. Wait to assemble until the day-of for crisp legs and fresh peanut butter cups. The eyes stay put fine if added several hours before serving.
Q4. What if my peanut butter cups won’t stick?
Press them in immediately when cookies come out of the oven—that warmth softens the chocolate underneath. Still loose? Dab a tiny bit of melted chocolate under the cup as edible glue.
Q5. Help! My spider eyes keep sliding off!
Use thicker melted chocolate (cool slightly after melting) as “glue,” and hold each eye in place for 5 seconds. Chilling the cookies for 10 minutes after decorating helps everything set firmly.
Share Your Spooky Creations
Tag me when you make these! I can’t wait to see your creepy-crawly cookie masterpieces—extra points for creative spider poses! You can find more fun recipes on our Pinterest page.


Spooky 30-Minute Halloween Spider Cookies Kids Crave
- Total Time: 30 mins
- Yield: 24 cookies
- Diet: Vegetarian
Description
Creepy and fun Halloween spider cookies that are easy to make and perfect for spooky celebrations.
Ingredients
- 1 cup all-purpose flour
- 1/2 cup unsweetened cocoa powder
- 1/2 tsp baking soda
- 1/4 tsp salt
- 1/2 cup unsalted butter, softened
- 3/4 cup granulated sugar
- 1 large egg
- 1 tsp vanilla extract
- 24 mini peanut butter cups
- 48 candy eyes
- 1/2 cup chocolate chips, melted
- 24 thin pretzel sticks, broken into small legs
Instructions
- Preheat oven to 350°F (175°C). Line a baking sheet with parchment paper.
- Whisk flour, cocoa powder, baking soda, and salt in a bowl.
- Cream butter and sugar until fluffy. Beat in egg and vanilla.
- Gradually mix in dry ingredients until dough forms.
- Roll dough into 1-inch balls and place on baking sheet. Flatten slightly.
- Bake for 10 minutes. Press a peanut butter cup into each cookie while warm.
- Attach candy eyes with melted chocolate.
- Insert pretzel pieces as spider legs.
- Let cool before serving.
Notes
- Store in an airtight container for up to 3 days.
- Use gluten-free pretzels for a gluten-free option.
- Swap peanut butter cups for chocolate-covered caramels if allergic to peanuts.
- Prep Time: 20 mins
- Cook Time: 10 mins
- Category: Dessert
- Method: Baking
- Cuisine: American