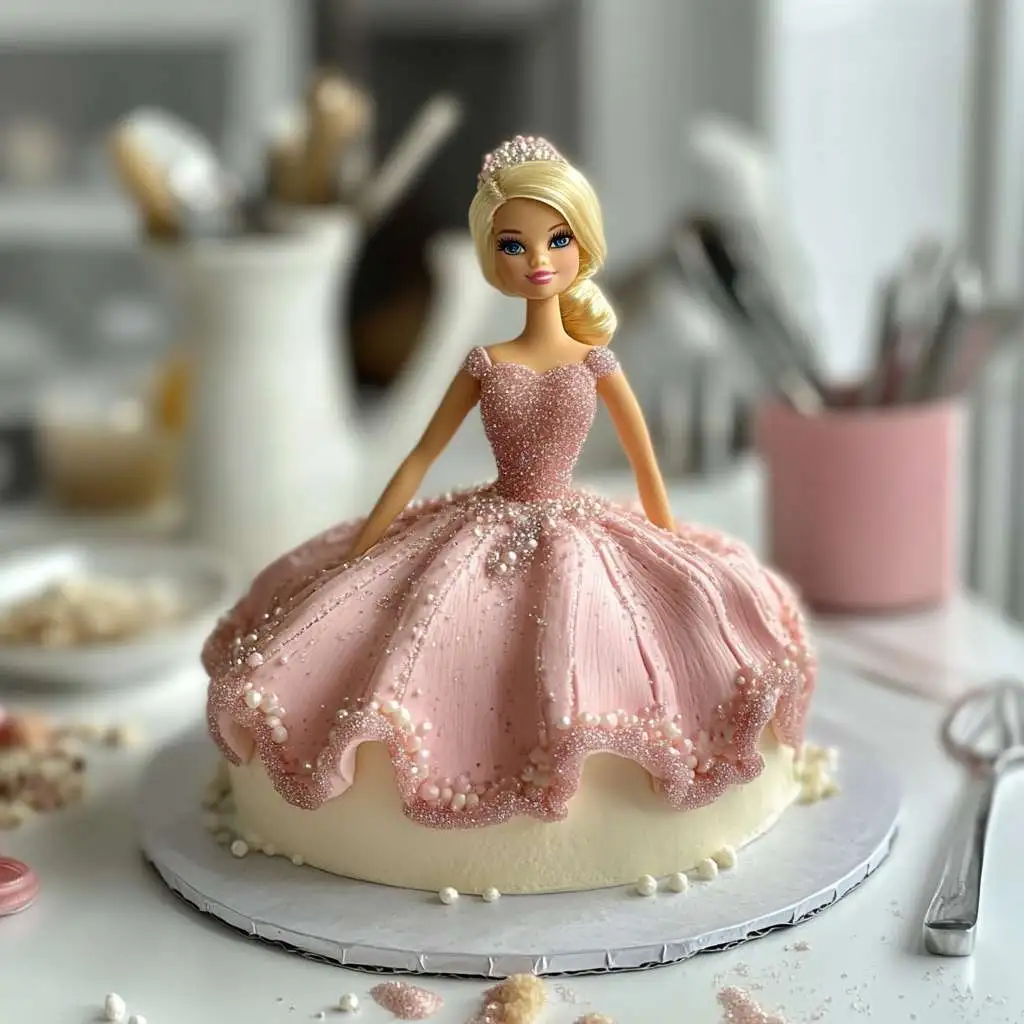
Have you ever dreamed of making a show-stopping Barbie cake for someone special? Whether it’s for a birthday, a themed party, or just because, a Barbie cake can make any celebration extra magical. But here’s the thing—while it might look like a professional masterpiece, making a Barbie cake at home is totally doable (yes, you can!). This guide will walk you through every step, from gathering the tools to creating the finishing touches. Ready to bake up some magic?
Table of Contents
Introduction
A Barbie cake is not just a dessert; it’s a statement piece that combines creativity, baking skills, and a touch of whimsy. Picture a doll decked out in an edible ball gown, perfectly sculpted and designed with delicious frosting and fondant. Sounds complicated, right? Don’t worry—this guide breaks it down into bite-sized steps so you can nail it, even if you’re a baking newbie.
Here’s what’s coming:
- A rundown of essential tools and ingredients
- Tips for sketching a design (because every cake is a mini work of art!)
- A detailed, step-by-step process that ensures you’ll get that wow factor
Essential Tools and Ingredients for a Barbie Cake
Baking Tools You’ll Need
Before we even think about turning on the oven, let’s get our tools ready. You don’t want to pause halfway through because you’re missing something important. Here’s what you’ll need:
- Mixing Bowls: For blending the cake batter and frosting.
- Measuring Cups and Spoons: Baking is all about precision, so measure carefully.
- Electric Mixer: To make your batter smooth and fluffy.
- Oven-Safe Bowls or Dome Pans: These are key to creating the dome-shaped “skirt” of the Barbie dress.
- Cake Turntable: For easy decorating (this isn’t mandatory but makes life so much easier).
- Offset Spatula: Perfect for spreading frosting evenly.
- Piping Bags and Tips: Essential for adding those intricate details to the dress.
- Rolling Pin: If you’re working with fondant, you’ll definitely need one.
- Plastic Wrap and Toothpicks: Handy for keeping things clean and secure.
💡 Pro Tip: Don’t have a dome-shaped pan? Stack regular round cake layers and carve them into the desired shape!
Key Ingredients for a Delicious Base
Great cakes start with quality ingredients. Here’s a simple list:
| Ingredient | Quantity | Purpose |
|---|---|---|
| All-Purpose Flour | 2 ½ cups | Forms the cake’s structure. |
| Granulated Sugar | 2 cups | Adds sweetness. |
| Baking Powder | 2 tsp | Helps the cake rise. |
| Salt | ½ tsp | Balances the sweetness. |
| Eggs | 4 large | Provides moisture and fluff. |
| Milk | 1 cup | Keeps the cake soft. |
| Butter (Unsalted) | 1 cup | Adds richness and flavor. |
| Vanilla Extract | 2 tsp | Enhances overall taste. |
🧁 Optional Extras: Food coloring (for a pop of color), chocolate chips, or edible glitter for flair.
For tips on baking moist and fluffy cakes, check out The Secret to Perfect Crumble.

Cake Types: Choosing Between Sponge, Chocolate, or Vanilla
When it comes to Barbie cakes, you can’t go wrong with a classic vanilla or chocolate sponge. Want to get creative? Marble cake is a fun twist that looks stunning when sliced. Here’s a quick breakdown:
- Sponge Cake: Light and airy—great for layering!
- Chocolate Cake: Decadent and rich—a crowd-pleaser.
- Vanilla Cake: Simple yet elegant, and pairs well with most frostings.
🎨 Pro Tip: Add food coloring to the batter for a vibrant surprise when guests slice into the cake. Think Barbie pink or pastel hues!
Fondant vs. Buttercream: What Works Best?
The big debate: Should you use fondant or buttercream? Both have their pros and cons.
- Fondant: Smooth, professional-looking finish. Perfect for intricate designs but less forgiving for beginners.
- Buttercream: Easier to work with and tastes amazing. However, it doesn’t give that flawless, polished look fondant provides.
For a Barbie cake, you can use a combination of both—fondant for the dress and buttercream for decorative accents.
Preparing for the Barbie Cake: Planning and Design
Choosing the Right Barbie Doll for Your Cake
First things first: The doll. Pick a Barbie that fits the theme. For instance:
- Classic Barbie: For a timeless, elegant cake.
- Princess Barbie: Perfect for fairy-tale themes.
- Customizable Doll: If you want to go all out, match the doll to the birthday person!
Make sure the doll is clean and wrapped in plastic wrap before inserting it into the cake. This keeps things hygienic and makes cleanup easier.
Sketching Your Cake Design
Think of this as your blueprint. Sketching a design helps you visualize the finished product and ensures everything goes smoothly. Ask yourself:
- What color will the dress be?
- Do I want ruffles, sparkles, or floral designs?
- Will the dress have multiple layers?
✏️ Pro Tip: Start simple if it’s your first time. A single-layer dress with a few decorative accents can still look amazing!
Matching the Cake Theme to the Party
If the Barbie cake is part of a larger party theme, coordinate the design. For example:
- Fairy Tale Party: Add edible flowers and glitter.
- Beach Theme: Use tropical colors and add edible seashells.
- Winter Wonderland: Go for icy blue and white tones with snowflake accents.
Fun Idea: Match the Barbie’s dress to the birthday outfit for a personal touch!
How to Determine the Perfect Cake Size
Think about how many people you need to serve. A 3-layer cake with an 8-inch base and a 6-inch dome is perfect for 12–15 people. Need more servings? Bake extra sheet cakes to serve alongside the Barbie centerpiece.
Step-by-Step Instructions for Making a Barbie Cake
1. Baking the Cake Layers
First up: the foundation. You’ll need at least 3 to 4 layers of cake to form the skirt. Here’s how to bake them:
- Preheat the oven to 350°F (175°C).
- Grease and line your cake pans with parchment paper. If you’re using an oven-safe bowl to create the dome shape, grease it thoroughly to prevent sticking.
- In a mixing bowl, cream together the butter and sugar until light and fluffy.
- Add the eggs, one at a time, mixing well after each addition. Stir in the vanilla extract.
- In a separate bowl, combine the flour, baking powder, and salt. Gradually add this dry mixture to the wet ingredients, alternating with milk.
- Pour the batter evenly into your pans and bake for 25–35 minutes (dome shapes may take a bit longer). Use a toothpick to check if the cake is done—it should come out clean.
- Let the cakes cool completely before moving on to the next step.
Pro Tip: Ensure your cakes are evenly baked by learning How Long Should You Knead Bread.
2. Assembling the Layers: Building a Strong Foundation
Once your cakes are cool, it’s time to assemble. Here’s how:
- Start by leveling the cake layers using a serrated knife or a cake leveler. This ensures stability and prevents a wobbly skirt.
- Spread a thin layer of buttercream or frosting between each layer to act as “glue.”
- Stack the layers, leaving the dome-shaped cake for the top to create the skirt’s curve.
- Once the layers are stacked, insert a dowel or skewer through the center to keep everything in place.
🔨 Troubleshooting Tip: If your layers are uneven or crumbly, don’t panic! Frosting is your best friend for patching up imperfections.
3. Shaping the Skirt of the Barbie Cake
Here’s where your cake starts looking like Barbie’s dress.
- Use a serrated knife to gently carve the cake into a skirt shape.
- Start at the top and gradually shave off small sections until you achieve a smooth, dome-like silhouette.
- Brush away crumbs with a pastry brush to keep the surface clean for frosting.
Creative Tip: For a dramatic flair, carve the bottom of the skirt to create ruffles or layers.
For more dessert inspiration, explore How to Make the Perfect Cinnamon Roll Cheesecake.
4. Inserting the Barbie Doll Safely
Now it’s time to add Barbie to her edible gown!
- Wrap the lower half of the Barbie doll (from the waist down) in plastic wrap. This keeps the doll clean and food-safe.
- Carefully insert the doll into the center of the cake. If the cake is too dense, create a small hole using a knife or dowel before inserting Barbie.
Pro Tip: If Barbie is too tall, gently bend her legs to fit, or use a smaller doll.
5. Applying the Base Layer of Frosting
This layer is like a primer for your cake—it smooths out imperfections and prepares the surface for decorating.
- Start with a crumb coat: Spread a thin layer of frosting over the entire cake. Don’t worry about it looking perfect; this layer is just to trap crumbs.
- Chill the cake in the fridge for 15–30 minutes to set the crumb coat.
- Add a thicker layer of frosting, smoothing it with an offset spatula.
Pro Tip: If you’re using buttercream, divide it into batches and add food coloring to match your theme.
Decorating the Cake: Fondant and Details

1. Working with Fondant
Fondant gives Barbie’s dress that flawless, satin finish.
- Roll out the fondant on a clean surface dusted with powdered sugar.
- Carefully drape the fondant over the cake, smoothing it out with your hands or a fondant smoother.
- Trim off excess fondant around the base with a knife or pizza cutter.
Creative Tip: Use cookie cutters or fondant molds to create decorative patterns like flowers, hearts, or stars.
2. Adding Textures and Patterns
This is where your Barbie cake truly comes to life!
- Ruffles: Use a piping bag with a petal tip to create cascading buttercream ruffles.
- Beading: Add edible pearls or beads along the edges for a touch of elegance.
- Glitter: Brush on edible glitter for a magical, sparkling effect.
3. Incorporating Edible Accessories
Think of Barbie’s dress as a blank canvas for your creativity. Some ideas:
- Belts or Sashes: Create these using strips of fondant or piped buttercream.
- Flowers: Add sugar flowers or real, non-toxic blooms for a stunning finish.
- Jewelry: Use tiny edible gems to give Barbie a necklace or bracelet.
🎉 Fun Idea: Add a tiara to Barbie’s head or edible shoes at the base of the cake.
Nutrition Facts for a Barbie Cake
Here’s an approximate breakdown for one slice (based on a vanilla cake with buttercream frosting):
| Nutrient | Amount per Slice |
|---|---|
| Calories | 350–400 |
| Total Fat | 15g |
| Saturated Fat | 8g |
| Carbohydrates | 55g |
| Protein | 4g |
| Sugar | 40g |
Note: Nutritional values will vary based on your recipe and decorations.
Troubleshooting Common Barbie Cake Problems
1. Cake Collapsing During Assembly
Imagine carefully stacking your layers only to watch them sag or fall apart. Frustrating, right? This usually happens if the cake is too soft or the layers aren’t level.
Solution:
- Always chill your cake layers before assembly. Cold cake is sturdier and easier to work with.
- Use a sturdy filling like ganache or thick buttercream to support the layers.
- Insert dowels or straws into the cake for extra structural support. These act like “pillars” for the skirt.
2. Frosting Issues: Cracking or Melting
If your frosting cracks, melts, or slides off the cake, the culprit is often temperature or consistency.
Solution:
- Keep your workspace cool, especially when working with buttercream. A warm kitchen can cause it to melt.
- If the frosting is too runny, add more powdered sugar to thicken it. If it’s too thick, mix in a tablespoon of milk at a time until you get the right consistency.
- Chill the crumb-coated cake before adding the final frosting layer.
Pro Tip: Use an air-conditioned room if you’re decorating on a hot day.
3. Fondant Tears or Bubbles
Fondant can be tricky, especially if it starts tearing or forming bubbles while you’re smoothing it over the cake.
Solution:
- Roll out fondant evenly to avoid thin spots that might tear.
- To fix a tear, dampen the area with a little water and smooth it out gently with your fingers.
- For bubbles, use a clean needle to prick the air pocket and smooth it with a fondant tool.
Pro Tip: Dust your hands and work surface with powdered sugar or cornstarch to prevent sticking.
4. Uneven Skirt Shape
If the skirt looks lopsided, it could be due to uneven carving or stacking.
Solution:
- Place your cake on a turntable for easier shaping. Spin it as you carve to ensure symmetry.
- Use a ruler or guide to check the height on all sides.
- If the skirt is already uneven, build it up with frosting or fondant to balance the shape.
Pro Tips for a Stunning Barbie Cake
1. Achieving a Professional Finish
To make your Barbie cake look like it’s straight out of a bakery, focus on the small details.
- Smooth your frosting with a bench scraper for a flawless base.
- Use edible glitter, metallic paints, or shimmer dust for an elegant touch.
- For intricate piping, practice on parchment paper before applying it to the cake.
2. Using Food Coloring for Unique Designs
Food coloring can elevate your Barbie cake from ordinary to extraordinary.
- Gel-based food coloring works best as it doesn’t water down your frosting or fondant.
- Create ombre effects by gradually adding more color to your frosting as you pipe.
- For realistic textures, use a sponge dipped in food coloring to dab patterns onto the fondant.
3. Incorporating Edible Flowers and Jewelry
Take inspiration from Barbie’s glamorous style by adding edible accessories.
- Use sugar flowers for a sophisticated look. You can buy them pre-made or make them at home with fondant or gum paste.
- Edible pearls, gems, and glittery accents give the cake a luxurious vibe.
Fun Tip: Add a fondant handbag or shoes at the base of the skirt for extra flair!
Creative Barbie Cake Variations
If you want to put a unique spin on your Barbie cake, try one of these fun ideas:
1. Princess-Themed Barbie Cakes
- Use pastel colors like pink, lavender, and baby blue.
- Decorate with edible tiaras, wands, and sparkly stars.
- Create a flowing fondant cape for the Barbie doll to make her look like royalty.
2. Holiday-Inspired Barbie Cakes
- Winter Wonderland: Use white and silver tones, add snowflake designs, and dust the cake with powdered sugar for a snowy effect.
- Summer Beach Theme: Incorporate vibrant colors, edible seashells, and tropical flowers.
3. DIY Budget-Friendly Barbie Cake Ideas
Making a fabulous cake doesn’t have to break the bank!
- Use buttercream instead of fondant for a cost-effective option.
- Create details with simple tools like toothpicks or forks.
- Opt for homemade decorations like piped rosettes or sprinkles instead of store-bought toppers.
Frequently Asked Questions About Barbie Cakes
1. Can I Use Any Barbie Doll in the Cake?
Yes, but make sure the doll is clean and wrapped in plastic wrap before inserting it into the cake. You can also remove the doll’s legs if it’s too tall for your design.
2. How Far in Advance Can I Make a Barbie Cake?
You can bake the cake layers 1–2 days in advance and store them in the fridge. Assemble and decorate the cake no more than a day before the event for the freshest results.
3. What’s the Best Way to Store Leftover Barbie Cake?
Wrap the leftover cake in plastic wrap or place it in an airtight container. Store in the fridge for up to 3–4 days.
Conclusion: Your Journey to the Perfect Barbie Cake
Creating a Barbie cake is more than just baking—it’s a creative adventure that brings joy to any occasion. From the initial planning stages to the finishing decorative touches, you now have all the tools and tips you need to make a stunning masterpiece. Whether you’re crafting a classic princess dress or experimenting with unique themes, the possibilities are endless.
So, roll up your sleeves, gather your supplies, and let your imagination run wild. Remember, perfection isn’t about being flawless—it’s about creating something meaningful and fun. Your Barbie cake is sure to leave everyone in awe and make the celebration unforgettable. Happy baking! 🎂👗💖