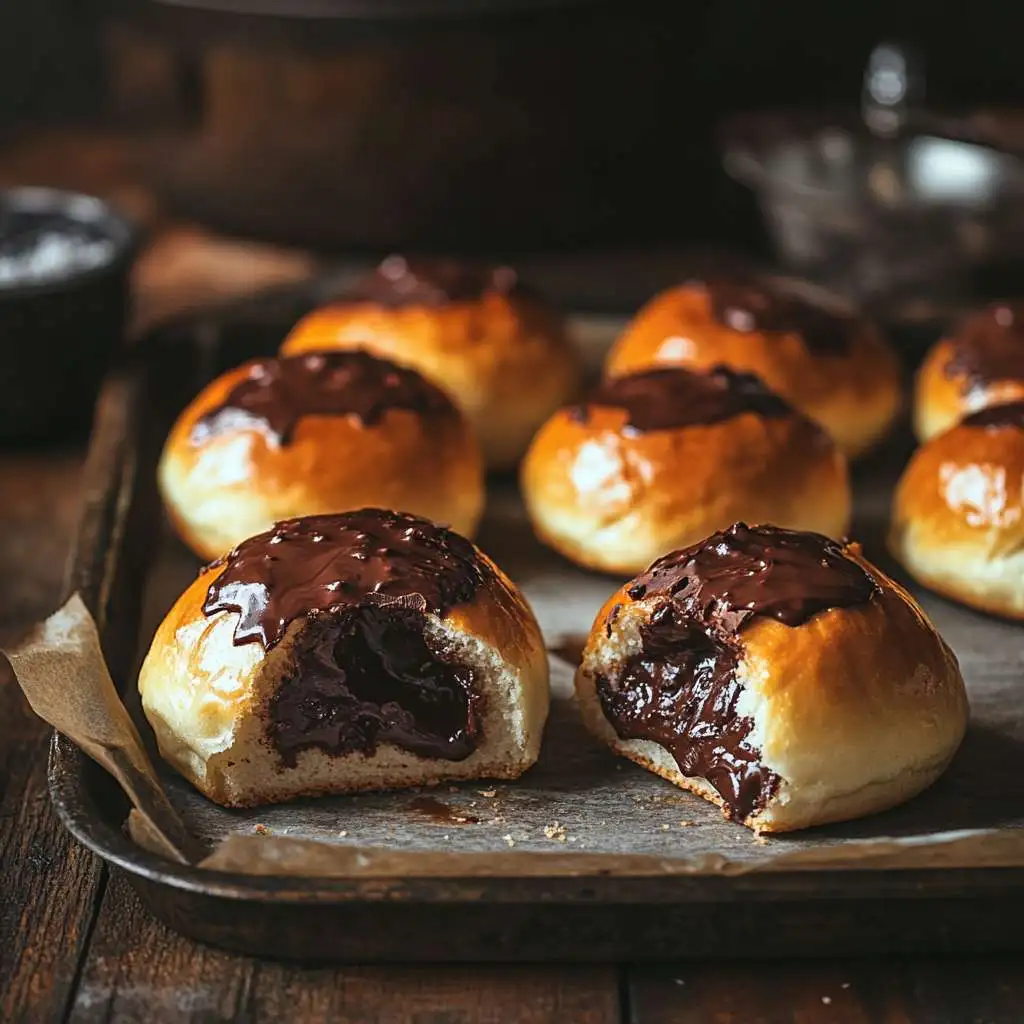
Who doesn’t love the smell of freshly baked chocolate buns wafting through the kitchen? Imagine biting into a soft, fluffy bun filled with rich, gooey chocolate—pure bliss! Whether you’re a baking newbie or an experienced home cook, this easy chocolate bun recipe is designed just for you.
In this guide, I’ll walk you through every step—from choosing the right ingredients to troubleshooting common baking problems. By the end, you’ll have a batch of heavenly chocolate buns that’ll make everyone in your home rush to the kitchen. So, let’s get baking!
Table of Contents
Why You’ll Love This Easy Chocolate Bun Recipe
Perfect for Beginners and Experts Alike
No fancy equipment? No problem! This recipe is super simple and requires just a few basic kitchen tools. Even if you’re a first-time baker, you’ll be able to nail this recipe like a pro.
Rich Chocolate Flavor with a Soft Texture
These chocolate buns aren’t just about the chocolate filling—the dough itself has a subtle chocolate flavor, making each bite even more delicious. Soft, pillowy, and perfectly sweetened, they’re guaranteed to become your new favorite treat.
Simple Ingredients You Already Have at Home
No need for a special trip to the store—these buns use everyday pantry staples! Plus, I’ll share some easy swaps in case you’re missing anything.
Essential Ingredients for Chocolate Buns
Before we start, let’s take a look at the ingredients you’ll need:
📝 Ingredients List
| Ingredient | Quantity |
|---|---|
| All-Purpose Flour | 3 cups |
| Unsweetened Cocoa Powder | 2 tbsp |
| Granulated Sugar | ¼ cup |
| Instant Yeast | 2 ¼ tsp (1 packet) |
| Salt | ½ tsp |
| Warm Milk | ¾ cup |
| Butter (melted) | ¼ cup |
| Egg | 1 |
| Chocolate Chips or Chunks | ½ cup |
| Milk (for brushing) | 2 tbsp |
💡 Pro Tip: Want an extra chocolatey flavor? Add an extra tablespoon of cocoa powder to the dough!

Step-by-Step Guide to Making Easy Chocolate Buns
Baking chocolate buns may seem tricky, but trust me—it’s as easy as making pancakes! Just follow these steps, and you’ll have delicious buns in no time.
Step 1: Preparing the Dough – Mixing and Kneading
- Activate the Yeast – In a bowl, mix warm milk (not hot!), sugar, and yeast. Let it sit for 5-10 minutes until it turns foamy. This means your yeast is alive and ready to work!
- Mix Dry Ingredients – In a large bowl, whisk together flour, cocoa powder, and salt. This will ensure the cocoa blends evenly into the dough.
- Combine Wet and Dry Ingredients – Add the foamy yeast mixture, melted butter, and egg into the dry ingredients. Mix everything until it starts forming a dough.
- Knead the Dough – Transfer the dough onto a floured surface and knead it for about 10 minutes until it becomes smooth and elastic. If it’s too sticky, sprinkle a little flour (but don’t overdo it!).
For best results, knead the dough for about 10 minutes until smooth and elastic. If you’re unsure how long to knead, check out this guide on kneading bread.
Why Kneading Matters
Kneading develops the gluten in the dough, making the buns soft and chewy instead of dense. Think of it as giving your dough a workout!
Step 2: Proofing for the Perfect Rise
- Place the dough in a greased bowl, cover it with a damp towel, and let it rest in a warm place for 1-2 hours, or until it doubles in size.
- If your house is chilly, you can put the bowl in a slightly warmed oven (turned off) to speed things up.
🛑 Common Problem: Dough Didn’t Rise?
✔️ Check if your yeast was fresh. Expired yeast won’t rise.
✔️ Your milk might have been too hot or too cold—it should be warm (around 110°F or 43°C).
✔️ Give it more time! Sometimes dough just needs an extra 30 minutes to rise properly.
Step 3: Shaping and Filling the Buns
- Punch down the dough (gently!) to release excess air.
- Divide it into 12 equal pieces and roll them into balls.
- Flatten each ball slightly and place a few chocolate chips or chunks in the center. Then, pinch the dough around the chocolate to seal it well.

Tip: Make sure the seam is facing down when placing them on the tray. This prevents them from opening while baking!
Step 4: Baking to Perfection
- Preheat the oven to 350°F (175°C).
- Arrange the buns on a baking tray lined with parchment paper. Leave space between them as they will expand.
- Brush the tops with milk for a shiny, golden finish.
- Bake for 15-18 minutes or until the buns turn a lovely golden brown.
- Let them cool for 10 minutes before biting in (I know, it’s hard to wait! ).
For extra indulgence, try melting high-quality chocolate like those used in the Dubai Chocolate Recipe Secrets.
Common Problems and How to Fix Them
1. Why Did My Dough Not Rise?
- Your yeast might be expired or inactive. Always check the expiry date!
- The liquid might have been too hot or too cold. It should be warm, not boiling.
2. My Chocolate Buns Are Dry – What Went Wrong?
- You might have added too much flour—always measure precisely.
- Overbaking can also cause dryness. Stick to the recommended baking time!
3. How to Prevent Overbaking and Hard Crusts
- Bake at the right temperature (350°F/175°C).
- Don’t bake for too long—15-18 minutes is usually perfect.
- Brush with milk or butter before baking to keep the crust soft.
Nutrition Facts (Per Chocolate Bun)
| Nutrient | Amount |
|---|---|
| Calories | 210 kcal |
| Carbohydrates | 32g |
| Protein | 5g |
| Fat | 7g |
| Sugar | 10g |
| Fiber | 2g |
Fun Variations and Twists on the Classic Chocolate Bun
Why stick to the basics when you can experiment? Here are some exciting variations you can try to make your buns extra special.
1. Adding Nuts, Caramel, or Extra Chocolate Chips
Want a crunchy surprise in every bite? Toss in some chopped almonds, hazelnuts, or pecans inside the filling.
Pro Tip:
- Caramel filling is another game-changer! Just add a teaspoon of caramel sauce inside before sealing the bun.
- Extra chocolate chips? Mix white and dark chocolate chunks for a rich flavor contrast.
2. Vegan and Dairy-Free Chocolate Bun Options
Yes! You can enjoy these delicious buns without eggs or dairy.
🌱 Vegan Ingredient Swaps:
- Milk ➝ Swap for almond milk, oat milk, or soy milk
- Butter ➝ Use coconut oil or vegan butter
- Egg ➝ Replace with a flaxseed egg (1 tbsp ground flaxseed + 3 tbsp water, let it sit for 5 minutes)
Pro Tip: Add a touch of maple syrup to the dough for a hint of extra sweetness.
3. Gluten-Free Chocolate Buns – Soft and Delicious!
If you’re gluten-sensitive, you don’t have to miss out! Just swap out regular flour for gluten-free all-purpose flour.
Gluten-Free Baking Tips:
- Add 1 tsp of xanthan gum to help the dough hold together.
- Let the dough rest a bit longer to improve texture.
- Expect the dough to be a little stickier—don’t over-flour it!
Want an extra crunch? Add a crumble topping inspired by The Secret to Perfect Crumble.
Expert Tips for Perfect Chocolate Buns Every Time
Want your chocolate buns to be bakery-perfect? Here are some pro secrets that make all the difference!
1. How to Achieve a Glossy, Golden Finish
The secret? Milk wash + butter glaze!
✔️ Before baking: Brush the buns with milk to get a nice golden brown crust.
✔️ After baking: Melted butter brushed on top makes them ultra-soft and shiny.
2. Storing and Reheating Chocolate Buns Properly
Nothing beats freshly baked buns, but they’re just as good when stored right!
🥡 Storage Tips:
- Store in an airtight container at room temperature for up to 3 days.
- Refrigerate for up to a week, but warm them before eating.
How to Reheat:
- Microwave: 15-20 seconds for a warm, gooey center.
- Oven: Reheat at 300°F (150°C) for 5-7 minutes to refresh the texture.
3. Best Pairings – Drinks and Toppings That Elevate the Taste
What goes best with chocolate buns? Here are some winning combos!
Drinks:
- A cup of hot cocoa makes it extra indulgent!
- Try coffee or chai tea for a rich contrast.
- A glass of cold milk = pure nostalgia!
Toppings:
- Powdered sugar dusted on top = bakery vibes
- Whipped cream and berries for a fancy twist.
- Nutella drizzle—because more chocolate is always a good idea!
Frequently Asked Questions (FAQs)
Here are some of the most common chocolate bun questions, answered!
1. Can I Make Chocolate Buns Without Yeast?
Yes! You can use baking powder instead, but the buns will be more like chocolate biscuits rather than fluffy yeast buns.
✔️ Yeast Alternative:
- Use 2 tsp baking powder instead of yeast.
- Skip the proofing time.
- Bake immediately after shaping!
2. How Long Do Homemade Chocolate Buns Stay Fresh?
At room temperature: 3 days
In the fridge: up to a week
In the freezer: 3 months (Wrap them individually and freeze!)
Reheat frozen buns in the oven at 300°F (150°C) for 10 minutes or microwave for 30 seconds.
3. What’s the Best Way to Add More Chocolate Inside?
- Use chocolate ganache instead of chocolate chips for a gooier filling.
- Add Nutella or peanut butter for a flavor twist.
- Freeze chocolate chunks before adding them to the dough so they don’t melt too fast in the oven!
Conclusion – Enjoy Your Homemade Chocolate Buns!
Congratulations! You’ve now got all the secrets to perfect, fluffy, chocolate-filled buns. Whether you stick to the classic recipe or try out fun variations, these buns will always be a hit!
So what are you waiting for? Grab your ingredients, bake a batch, and share the chocolatey goodness!