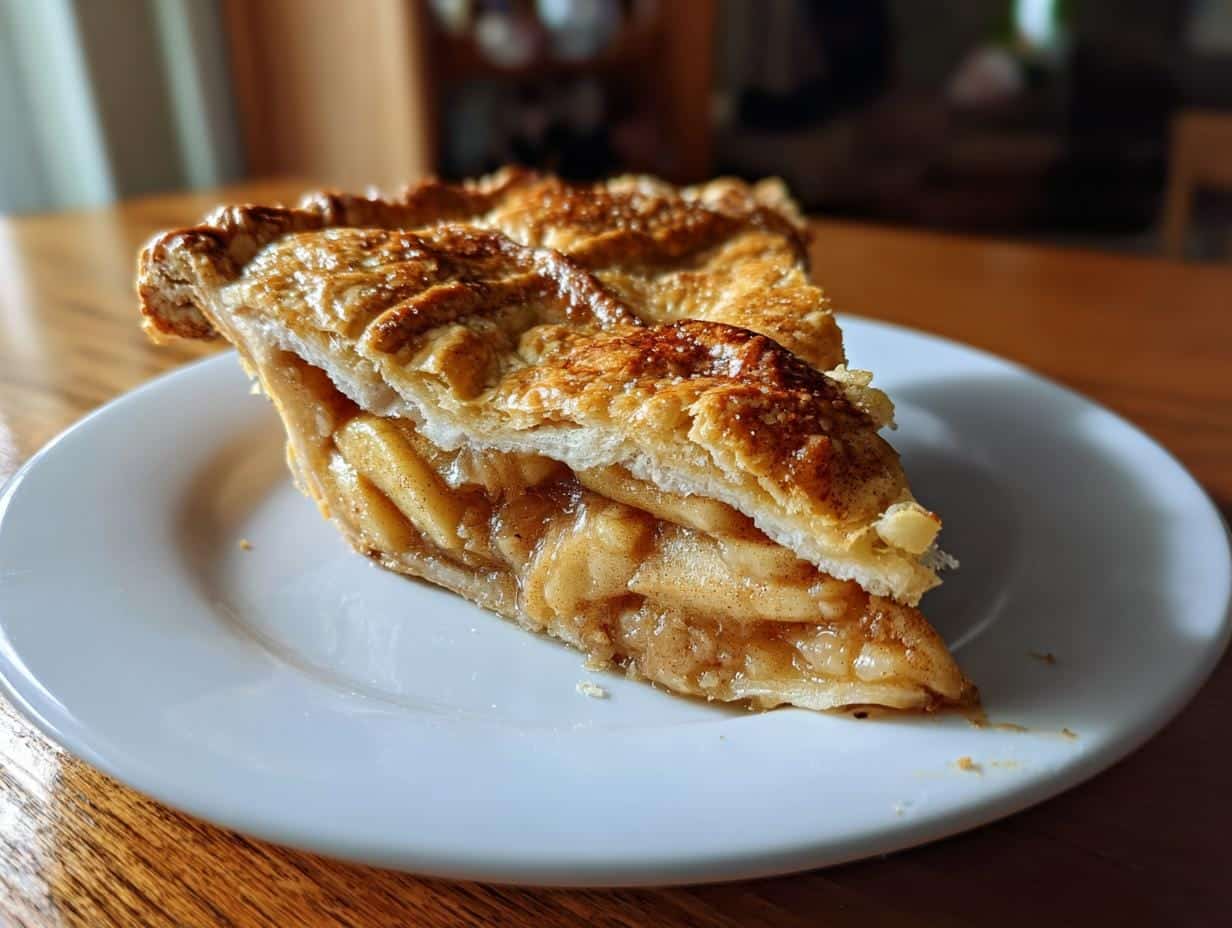
There’s something magical about pulling a cinnamon apple pie from the oven—that first whiff of buttery crust and caramelized apples stops everyone in their tracks. I learned this recipe from my Aunt Margie, who always said, “A good pie makes the whole house smell like home.” She’d bake one whenever we visited, and now, every time I slice into that golden crust, I’m right back at her kitchen table, waiting impatiently for that first still-too-hot bite.
This cinnamon apple pie is my go-to for lazy Sundays and holiday gatherings alike. The secret? A flaky, tender crust that shatters just right, hugging a filling that’s sweet but not cloying—thanks to a generous hit of cinnamon and a splash of lemon juice to keep things bright. I like using a mix of tart Granny Smith and sweet Honeycrisp apples for depth. Trust me, once you’ve tried homemade, those store-bought versions just won’t cut it. The best part? It’s easier than you think—no fancy skills required, just good ingredients and a little patience while it bakes to perfection.
Table of Contents
Why You’ll Love This Cinnamon Apple Pie

This pie isn’t just dessert—it’s a hug in pie form. Here’s why it’s become my most-requested recipe:
- That crust: Flaky, buttery layers that shatter with every forkful—thanks to my foolproof chilling method
- The filling magic: Apples that stay tender (never mushy) with the perfect balance of cinnamon warmth and bright lemon zing
- Effortless elegance: Looks bakery-worthy but comes together with basic pantry staples
- Crowd-pleaser charm: Equally perfect for summer picnics or Thanksgiving dinner—I’ve never brought home leftovers
- Nostalgia in every bite: The aroma alone will transport you to your favorite childhood kitchen
Pro tip: The crust stays crisp for days if you resist cutting into it while piping hot (good luck with that!).
Ingredients for Cinnamon Apple Pie
Great pie starts with great ingredients—and trust me, I’ve learned the hard way that shortcuts don’t cut it here. Here’s exactly what you’ll need (and why each one matters):
- 2 1/2 cups all-purpose flour – Spoon and level it, don’t scoop! This keeps the crust tender
- 1 cup unsalted butter, chilled and cubed – I freeze mine for 15 minutes first for extra flaky layers
- 1/2 teaspoon salt – Just enough to make the flavors pop without tasting salty
- 6-8 tablespoons ice water – So cold it hurts your fingers—this prevents gluten development
- 6-7 medium apples (I use 3 Granny Smith and 3 Honeycrisp) – Peeled and sliced 1/4″ thick for perfect texture
- 3/4 cup granulated sugar – The Goldilocks amount—sweet but lets the apples shine
- 2 tablespoons lemon juice – My secret weapon against dull, one-note filling
- 2 teaspoons ground cinnamon – Freshly ground if you’re feeling fancy
- 1/4 teaspoon each nutmeg and allspice – The “background singers” to cinnamon’s lead
- 2 tablespoons cornstarch – No soupy slices here!
- 1 egg, beaten – For that gorgeous golden sheen
See? Nothing weird—just honest ingredients that make magic together. Now roll up those sleeves!
Equipment You’ll Need
No fancy gadgets required—just these trusty kitchen staples (I bet you’ve got most already):
- Large mixing bowl (I use my grandma’s dented metal one)
- Pastry cutter or fork (cold fingers work too in a pinch)
- Rolling pin (a wine bottle does the job if you’re improvising)
- 9-inch pie dish (glass shows the prettiest golden crust)
- Sharp knife for apple slicing
- Pastry brush (or just crumple some foil for the egg wash)
See? Nothing special – just the basics for pie magic.
How to Make Cinnamon Apple Pie
Okay friends, this is where the magic happens! Don’t let the multiple steps fool you—I’ve broken everything down so simply that even my pie-challenged cousin nailed it on her first try. Just follow these stages, take your time, and that heavenly aroma will be filling your kitchen before you know it!
Preparing the Pie Crust
First rule of pie club: keep everything cold. I toss my flour and salt together in that trusty mixing bowl, then work in the butter cubes quickly with my pastry cutter until the mixture looks like lumpy sand with some pea-sized butter bits remaining. This is good—those butter chunks will create flaky layers later!
Now here’s my trick: I drizzle in the ice water tablespoon by tablespoon, using a fork to gently mix until the dough just barely holds together when pinched. No kneading! I divide it into two uneven discs (one slightly larger for the bottom crust), wrap them in plastic, and chill for at least an hour. This rest period prevents shrinkage—trust me, it’s worth the wait.
When ready, I flour my counter lightly and roll the larger disc into a 12-inch circle, lifting and turning the dough frequently to prevent sticking. Gently fold it into quarters, transfer to the pie dish, then unfold and press it in without stretching (stretching = shrinkage!). I trim the edges to about 1/2-inch overhang and pop the whole thing in the fridge while I make the filling.
Making the Apple Filling
While my crust chills, I prep the apples—this is where things get fragrant! I toss my apple slices with lemon juice immediately to prevent browning, then add sugar, cinnamon, nutmeg, and allspice. The cornstarch gets sprinkled in last—this is our insurance against a runny pie. I let the mixture sit for 15 minutes while the sugar draws out juices (stir occasionally), then drain off about half the liquid. Perfect filling consistency every time!
Pro tip: Taste a slice! If it needs more zing, add another squeeze of lemon. Too sweet? A pinch of salt balances it beautifully.
Assembling and Baking
Time to assemble our masterpiece! I pile the drained filling into the chilled crust, mounding it slightly in the center. Then I roll out the top crust just like before, lay it over the apples, and trim the edges to about 1 inch overhang. Here’s where I get fancy—I fold the overhang under itself to seal, then crimp with my fingers (or fork tines for a simple pattern).
Don’t forget vents! I cut 4-5 slits in the top crust (my kids love helping make decorative designs). A quick egg wash (just beat an egg with 1 tbsp water) gives that gorgeous golden shine, then it’s into the preheated 375°F oven on a baking sheet (catches drips!). I bake for 45-50 minutes until the crust is deep golden brown and juices bubble thickly through the vents.

Now the hardest part—letting it cool at least 1 hour before slicing. I know, I know…but this sets the filling so you get perfect slices instead of apple soup. Worth the wait!
Tips for the Perfect Cinnamon Apple Pie
After years of trial and error (and a few apple-flavored puddles), here are my foolproof secrets for pie perfection:
- Apple alchemy: Mix tart Granny Smiths with sweeter varieties—the contrast makes flavors sing
- Chill out: Keep dough cold at every stage (I even chill my rolling pin!) to prevent shrinkage
- Bottom crust armor: Brush unbaked crust with egg white before adding filling to block sogginess
- Slice smart: Cut apples uniformly so they cook evenly—no mushy bits next to crunchy ones
- Bake boldly: Wait until juices bubble thickly through vents—underbaked pie equals runny disaster
Remember: Great pie isn’t rushed. Let it cool completely—those perfect slices are worth the wait!
Serving Suggestions
Oh, let me tell you how we serve this beauty in my house! That first warm slice absolutely demands a scoop of vanilla ice cream melting into the cinnamon-kissed crevices—it’s pure magic. For breakfast (don’t judge!), I love it with a dollop of lightly sweetened whipped cream and an extra dusting of cinnamon. And when I’m feeling fancy? A drizzle of salted caramel sauce takes it over the top. Pro tip: Reheat slices at 350°F for 10 minutes if you want that just-baked warmth again.
If this pie is up your alley, you’ll want to browse:
- Classic Apple Crumble Bars
- Baked Cinnamon Crumb Donuts
- Warm Baked Apple Fritters
- Cheesecake Stuffed Baked Apples
- Spiced Apple Cider Donut Loaf
- Easy Homemade Caramel Apple Jam
Storing and Reheating
Here’s how I keep my cinnamon apple pie tasting fresh—if it lasts more than a day in your house! At room temp, it’s perfect for about 2 days (just cover loosely with a clean towel). For longer storage, pop it in the fridge for up to 5 days—the cold makes the crust extra sturdy. Freezing? Wrap the whole pie or individual slices tightly in plastic, then foil, and freeze for 3 months. To reheat, I do 350°F for 15 minutes straight from frozen—crisps everything up beautifully. Pro tip: Slide a baking sheet underneath to catch any drips!
FAQs About Cinnamon Apple Pie
I’ve gotten so many questions about this pie over the years—here are the ones that come up most often in my kitchen (and my honest answers!):
Can I use store-bought crust?
Oh honey, I know that temptation—we’ve all been there! While homemade crust makes all the difference, in a pinch, refrigerated pie dough works. Just unroll it gently, let it warm slightly at room temp first, and patch any tears with water-pasted scraps. My compromise? Use store-bought for the top crust if you must, but always homemade for the bottom—that’s where texture matters most.
How do I prevent a runny filling?
This was my nemesis for years! The magic trio: cornstarch (don’t skimp), draining excess juice (I save it for pancakes!), and patient cooling. Undercooked pie is the main culprit—wait for those thick, slow bubbles in the vents. If your apples were extra juicy? Let the filling sit overnight in the fridge—the starch sets up beautifully.
Can I make this pie ahead?
Absolutely! My Thanksgiving lifesaver: assemble the unbaked pie up to 2 days ahead, keep it chilled, then bake it the morning of. Already baked? It keeps at room temp for 2 days—just reheat slices to revive the crust. Frozen baked pie reheats like a dream at 350°F for 20 minutes. Pro tip: Brush cooled crust with milk before reheating to refresh the sheen!
Nutritional Information
Now, I’m no nutritionist (I just play one in my kitchen!), but here’s the scoop on what’s in each glorious slice: about 320 calories, with 25g of natural sweetness from those apples and sugar. You’re looking at 14g of fat (mostly from that glorious butter) and 4g of fiber to keep things balanced. These are just estimates of course—your mileage may vary depending on apple varieties and how generously you slice it!
Share Your Experience
I’d love to hear how your cinnamon apple pie turns out! Did your kitchen smell as heavenly as mine always does? Tell me all about your pie adventures below—the triumphs, the flops, and everything in between. You can also find more delicious recipes on our Pinterest page!


Irresistible 6-Ingredient Cinnamon Apple Pie Magic
- Total Time: 1 hour 20 minutes (plus chilling time)
- Yield: 8 servings
- Diet: Vegetarian
Description
A classic cinnamon apple pie with a flaky crust and sweet, spiced apple filling.
Ingredients
- 2 1/2 cups all-purpose flour
- 1 cup unsalted butter, chilled and cubed
- 1/2 teaspoon salt
- 6–8 tablespoons ice water
- 6–7 medium apples, peeled and sliced
- 3/4 cup granulated sugar
- 2 tablespoons lemon juice
- 2 teaspoons ground cinnamon
- 1/4 teaspoon nutmeg
- 1/4 teaspoon allspice
- 2 tablespoons cornstarch
- 1 egg, beaten (for egg wash)
Instructions
- Mix flour and salt in a bowl. Cut in butter until the mixture resembles coarse crumbs.
- Add ice water one tablespoon at a time until the dough comes together. Divide into two discs, wrap, and chill for 1 hour.
- Preheat oven to 375°F (190°C).
- Toss apples with sugar, lemon juice, cinnamon, nutmeg, allspice, and cornstarch.
- Roll out one dough disc and fit it into a pie dish. Add the apple filling.
- Roll out the second dough disc and place it over the filling. Seal and crimp the edges. Cut slits on top.
- Brush with egg wash. Bake for 45-50 minutes until golden brown.
- Cool for at least 1 hour before serving.
Notes
- Use a mix of tart and sweet apples for the best flavor.
- Chill the dough to prevent shrinking during baking.
- Serve with vanilla ice cream for extra indulgence.
- Prep Time: 30 minutes
- Cook Time: 50 minutes
- Category: Dessert
- Method: Baking
- Cuisine: American


